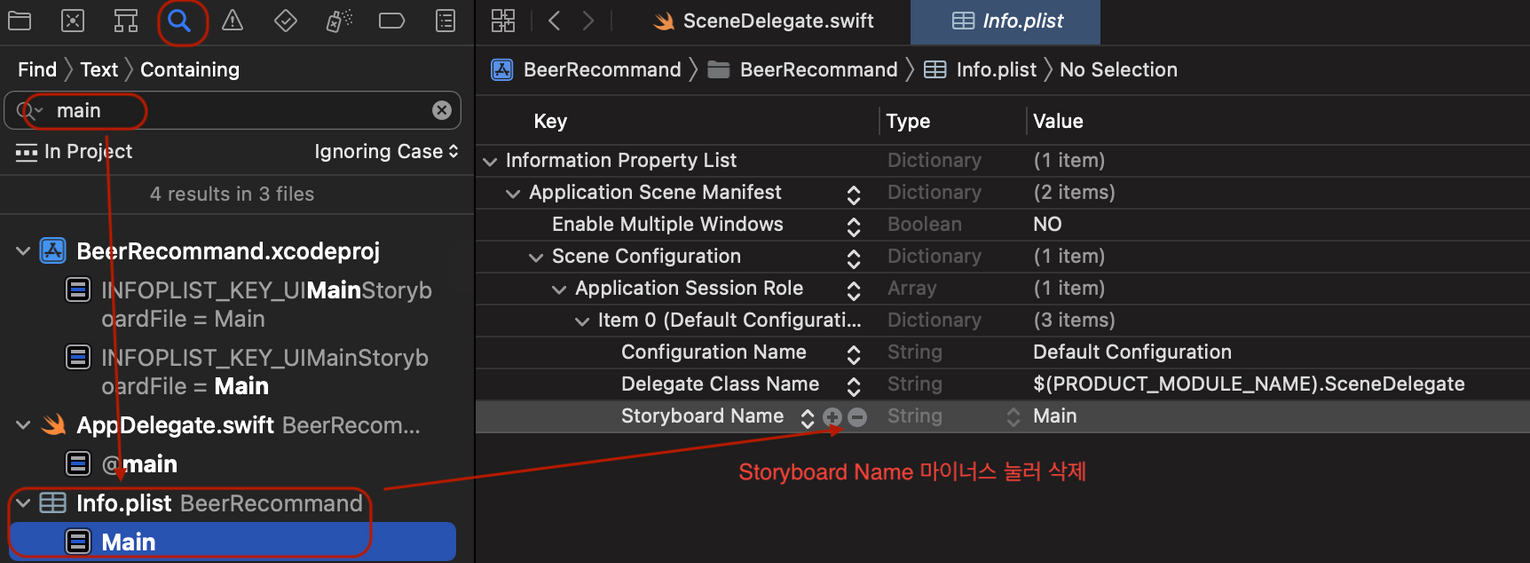
1. StoryBoard 참조를 제거하기위한 과정
1) 파일 삭제
- main.storyboard 삭제.

2) 기본 설정 제거작업
- UIKit Main Storyboard File based name 삭제.

- info.plist 내 Storyboard Name 삭제.

2. AppDelegate.swift 기본 Window 구성
- SceneDelegate.swift 내 가장 상단 메소드인 willConnectTo 내용변경
// SceneDelegate.swift
//

var window: UIWindow?

func scene(_ scene: UIScene, willConnectTo session: UISceneSession, options connectionOptions: UIScene.ConnectionOptions) {
    //Window  초기화
        guard let windowScene = (scene as? UIWindowScene) else { return }
    window = UIWindow(windowScene: windowScene)

        // ViewController 초기화
        let mainViewController = ViewController()

        // MARK: Window 구성
    window?.rootViewController = mainViewController
        // 화면에 띄울 Root 뷰 컨트롤러 지정

    window?.backgroundColor = .systemBackground
        // Window의 Background Color설정.
        // window 또는 ViewController의 backgroundColor중 하나는 설정되어야합니다.
        // 둘중 하나 미설정시 검은화면만 보입니다.

    window?.makeKeyAndVisible()
        // 구성된 창 띄우기
        // 이것도 미설정시 검은화면


    // 이 메소드를 사용하여 UIWindow `window`를 선택적으로 구성하고 제공된 UIWindowScene `scene`에 연결합니다.
    // 스토리보드를 사용하는 경우 `window` 속성이 자동으로 초기화되어 장면에 연결됩니다.
    // 이 델리게이트는 연결 장면이나 세션이 새롭다는 것을 의미하지 않습니다(대신 `application:configurationForConnectingSceneSession` 참조).
}
3. ViewController 기본 구성하기.
- 라벨 하나만 초기화 한 기본적인 ViewController 샘플입니다.
- 설정이 제대로 되었다면 Welcome To ViewController 라벨이 중앙에 표시됩니다.
// ViewController.swift

import UIKit

class ViewController: UIViewController {

  let label = UILabel()

  override func viewDidLoad() {
      super.viewDidLoad()
      setup()
      style()
      layout()
  }
}

//MARK: - Style & Layouts
extension ViewController {

  private func setup() {
      // 초기 셋업할 코드들
  }

  private func style() {
      // [view]
      view.backgroundColor = .systemBackground

      // [Label]
      label.translatesAutoresizingMaskIntoConstraints = false
      label.numberOfLines = 0
      label.font = UIFont.preferredFont(forTextStyle: .title1)
      label.textAlignment = .center
      label.text = "Welcome to \n ViewController"

      view.addSubview(label)


  }

  private func layout() {

      // [label] 기본 중앙 배치
      NSLayoutConstraint.activate([
          label.centerXAnchor.constraint(equalTo: view.centerXAnchor),
          label.centerYAnchor.constraint(equalTo: view.centerYAnchor)
      ])
  }
}
위 설정이 제대로 적용되었다면 아래화면이 표시됩니다.

반응형
'개발 > Swift' 카테고리의 다른 글
| [Swift] CoreData 정렬 기능 추가하기 (0) | 2022.08.08 |
|---|---|
| [Swift] 라이트 모드 또는 다크모드 고정하기 (0) | 2022.08.08 |
| [Swift] NS Coder로 간단한 Data 저장하기 (Data CRUD - 2) (0) | 2022.07.14 |
| [Swift] UserDefaults로 간단한 데이터 저장하기 (Data CRUD - 1) (0) | 2022.07.14 |
| [Swift] 타이머 생성하기 (0) | 2022.07.12 |

